VW Baywindow Bus - Sealing the Exhaust to the Head
by Richard Atwell
(c) Copyright 2005-2011
VW Baywindow Bus - Sealing the Exhaust to the Headby Richard Atwell |
|
Apart from making sure the heads are properly sealed to the engine another equally important task for engine reassembly is making 100% sure that the exhaust manifolds are sealed to the head. This is especially important on the Type 4 engine because of its exhaust port layout.
Failure to properly seal the exhaust will result in an overheated head, usually at the exhaust valve but not limited to.

|
|
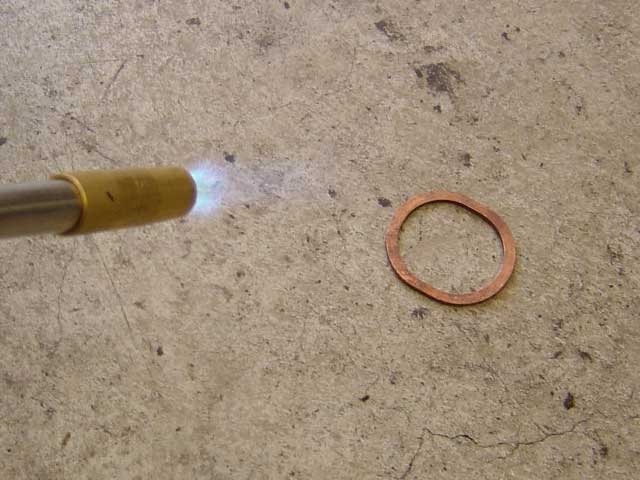
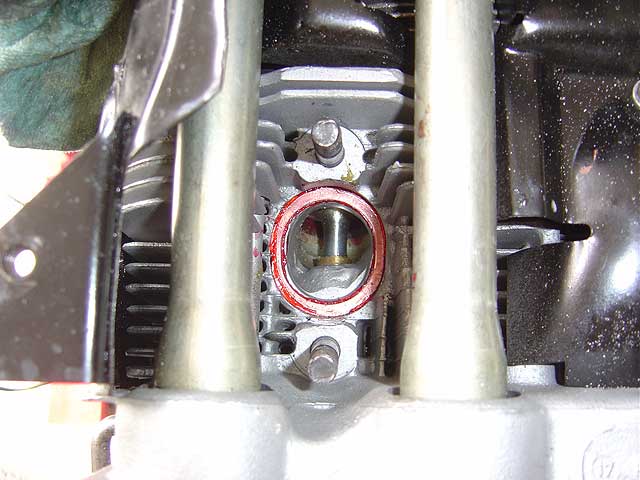
| Copper sealing rings sit between the head and the exhaust manifolds on 72-78 engines. 79 engines have a square port design that seal differently. ALWAYS use new rings: they are inexpensive and you only need 4 per engine.
In the photo above, the left ring is new and is usually 2.0-2.2mm thick. If you were to mount the manifold without the rings you would find that the the manifolds just barely seal against the exhaust port. Therefore, the thickness of the ring, provides 2mm of crush when installed. The middle ring shows what happens when the exhaust doesn't seal properly. The dark side on the left is where the exhaust leaked out and the right side is where the ring made a good seal with the engine. This was not the fault of the ring but the fault of the manifold sealing surface. Remember you are often trying to mate a rebuilt head with an original heaterbox. Who knows what VW did at the factory to match parts so you have to make sure the fit is correct especially when the parts come from more than one engine and have some degree of wear. The ring on the right has been annealed with a propane or MAPP torch. The idea is to soften the copper so it can crush between the head and the exhaust manifold. There is a visual clue that it's been annealed: you can often see the oxidization from the heating process and a slight color change. The real test is to drop it 6" onto the concrete. If it makes a ringing sound, then it has not been annealed. You should also be able to bend it (be careful) when it's annealed. At first I was skeptical of this method believing that the heat of the exhaust parts would anneal the copper and when you re-torqued the exhaust you would achieve some more crush on the copper ring but that's not the case. If you drop an old exhaust sealing ring on the floor it will make a metallic sound. This tells you that the heat of the exhaust is not hot enough to soften the copper. The torch is the only way to work the copper so it's soft. It also may enlarge the ring slightly for a tighter fit. Anneal the ring on a torch proof surface such as a fire brick. You can work directly on a concrete surface but be warned that concrete contains moisture that might turn to gas and explode under heating. Wear a face mask so you aren't breathing in vapors from the copper or the torch and have some eye protection. Use an infrared gun to measure the surface temperature of the rings by moving the flame away for a moment and once you hit 900F pick up the ring with pliers and drop the ring in a can of water to quench it. NEVER touch the ring until it's been cooled by the water (instantly). Drop it on the floor again and notice it doesn't make a metallic sound. VW did not anneal the rings but this is a good technique to help seal a used head to a used heat exchanger. I wouldn't bet that the Dansk/JPGroup heat exchangers have perfectly flat manifold tops to begin with and aftermarket heads may not have been machined well enough. |
|

|
|
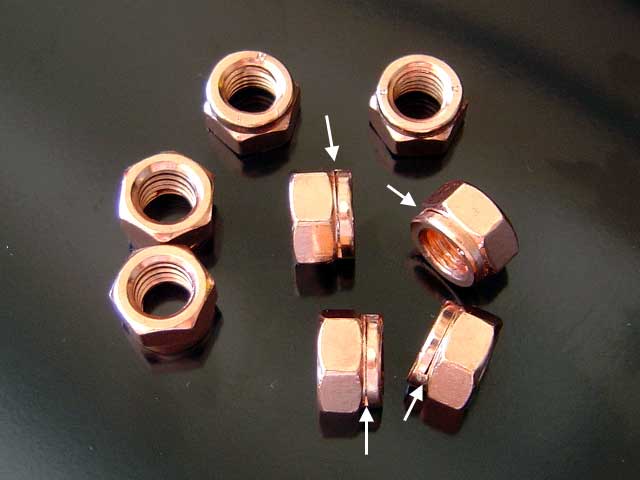
| Exhaust nuts come in two self-locking styles. The first style is flanged and has a heavy copper coating. The flange provides a larger surface to press against the ears of the manifolds. This type is oval at one end which is how it locks against the stud and is commonly called a jet nut. BMW's use this style of exhaust nut. The nuts do not require any copper anti-seize on the threads. If you use some, use it sparingly because you only want to prevent the stud from rusting, not accidentally bind the nut. | The second style is copper plated and has a slit at the top that makes the nut self-locking. Normally an 8mm nut is 13mm WAF (wide across the flats) but these nuts are both 12mm WAF which helps in the tight confines of the exhaust port area because often a 12mm socket is slightly more narrow than a 13mm socket. |
Before you can fit the heat exchangers you must ensure that they will fit properly.
|

|
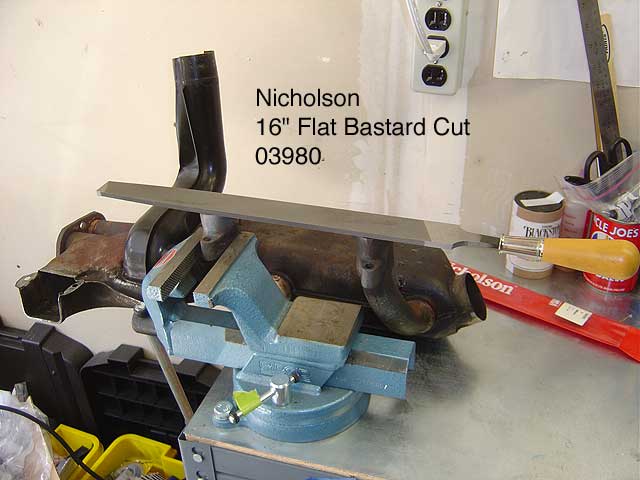
| To best way to flatten the tops of the manifold for a perfect seal is to clamp the manifold in a vise and use the largest file you can find. I'm using this 16" file that I found on sale for $15. A file of this length will let you file both manifolds at once quickly. Use a bastard cut so you aren't filing material away too quickly or leaving a rough surface. Use a 12" file and you may get the tops to look clean but they will probably not end up level with each other. If you lack a vice, acquire one for your shop. | The tops are probably going to be very hard and discolored. Use a marker such as a sharpie to color the sealing surface so you can watch the file remove the metal. Remember, a single cut file only cuts one way so get your technique down before you dull the file with the hard metal of the manifold. BEFORE you begin measure and record the height of the tops to the mounting ears below using a depth gauge. You will need this number later. |

|

|
| As you file you may notice that the file is not removing some of the material. This will probably happen so rock the file on the manifold at eye level and make sure you are not leaning too much on one end of the file as you try to level your cut. | Keep applying the sharpie to track the even removal of metal. |
|

|
| Eventually you will be rewarded with a smooth, shiny, nick-free surface on both tops. There should be no rocking of the file when laid on the tops. If there is then you are going to have sealing issues with the head. I probably spent 60-90 minutes filing the top of 2 manifolds to make sure I only removed the minimum amount of material. | As this point you have to remeasure the depth of the tops to the ears and compare it to the number you recorded earlier. The bastard file is fairly gentle compared to a 1st or 2nd order cut so you should only have removed a fraction of a millimeter. If you've removed more than the thickness of the copper sealing rings or if the PO had removed too much metal you will have to file the ears down. The reason for this is that the ear will contact the head before the tops do and you'll never get the exhaust to seal. |

|
|
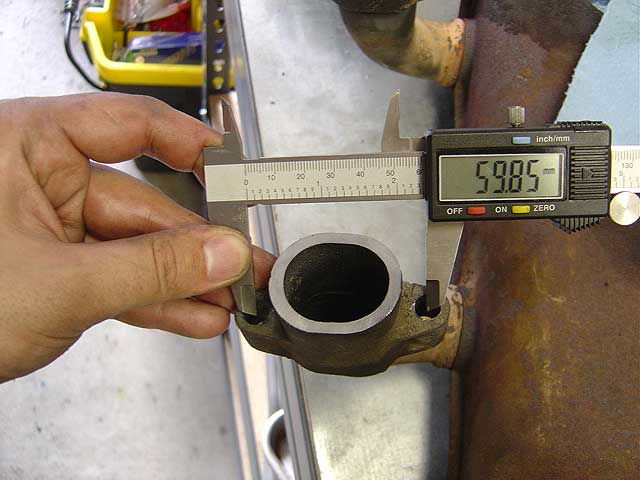
| If you are lucky the heat exchangers will slide onto the exhaust studs without any binding. The studs are 8mm and the holes in the ears of the manifold are 9mm. Because there are two studs the slack is split between them. If you've had the studs replaced be sure to check the fit BEFORE you assemble the engine otherwise you may not be able to seal the head and you will have to remove it. If the AMC factory screwed up or there has been a poorly done stud replacement, the distance could be too great for the holes in the exhaust flanges. | In these two photos (left and right) you can see how the manifold has no chance of sliding over the studs. The holes are 60mm apart and the studs need to be exactly that far apart, at the correct angles, height and distance from port to port. The outside studs are supposed to be 182mm apart and the inside ones 176mm. |

|
|
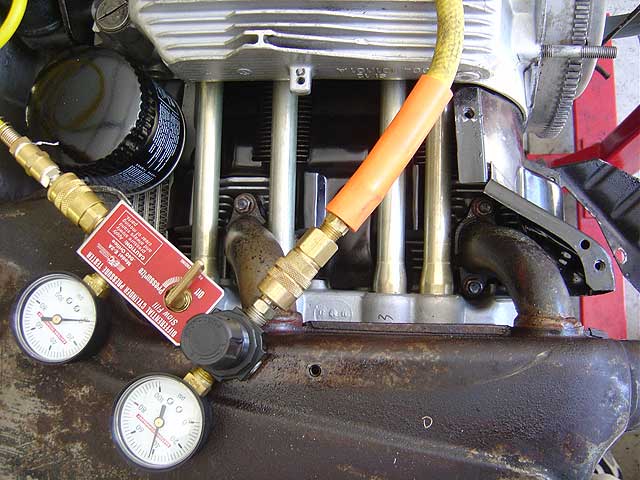
| Some people recommend drilling the holes in the manifold ears one or two sizes larger as a matter of practice. Personally I believe this to be a bad idea unless it's necessary because the metal is very hard and unless you have access to a mill you might drill the holes incorrectly. This could mean a manifold that will only bolt to that head. Instead just use some grease to slide the manifold on. If the manifold has warped you must drill the holes bigger so just make them big enough. | Fit your heat exchanger with regular 8mm nuts and test the seal. I use a leak-down gauge because it lets me control the airflow. Mount the HE and open the exhaust valve by rotating the engine. Leave the muffler off. When you turn on the airflow it will come out through the exhaust port; use your hand to block the HE to muffler opening. This will force the air to find another path. If you find you can't keep your hand over the opening you've got a good seal. If you hear the air escaping from the exhaust port you've got a sealing problem. A little liquid sprayed at the base of the exhaust port with the manifold attached will bubble if air is escaping. At this point you've got to recheck the sealing surfaces and remeasure to determine why you are getting a leak. |
|

|
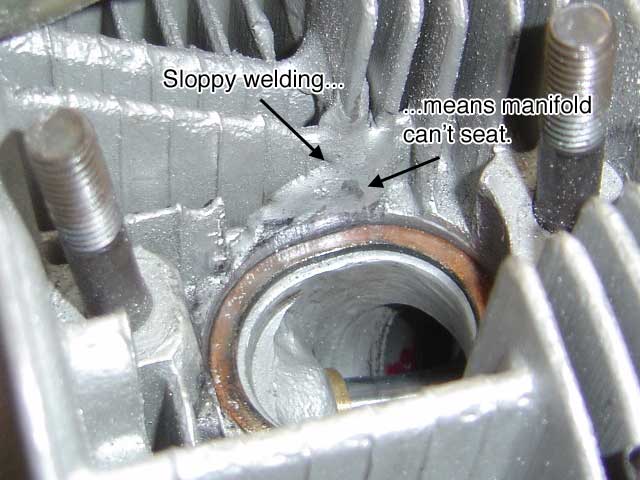
| A potential cause for frustration is sloppy welding. If the head has been rebuilt and the cracks on the fins welded you may discover the manifold contacts the weld before the copper ring. A little sharpie marking up the walls of the exhaust port will help you identify any premature contact. A Dremel works best for grinding the material away. Be sure to stuff a greasy towel in the exhaust port to catch any filings that will fall in. | When you are ready to bolt the HE to the head, use regular 8mm nuts a second time instead of the copper coated exhaust nuts. The coated nuts are self-locking and should only be used once. I've applied some Loctite 518 to both sides of the copper rings to help the exhaust seal. You can also use weatherstripping adhesive or anything similar. All of the sealants turn to carbon from the heat and help to provide a carbonized seal. The Loctite is nice because it's so tacky but I haven't used it enough times to say it's better than anything else. |
|
|
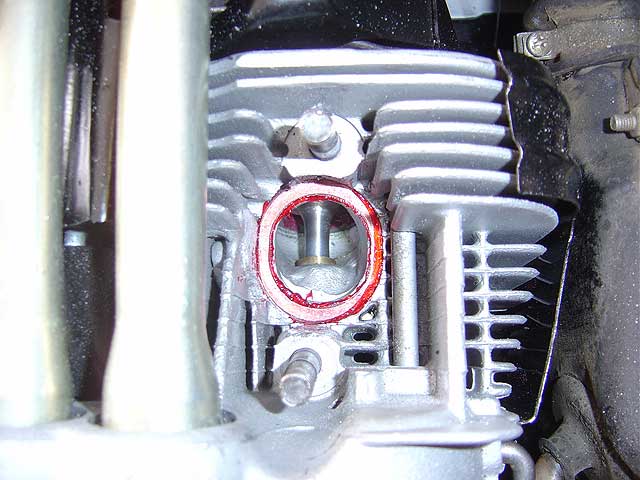
| Another benefit of the thick Loctite gasket maker is that it will let you see how much contact your seal makes. In the photo you can see that because of the stud alignment issues the two mating surfaces are not exactly aligned but the seal is good (verified with the leak-down gauge). | Loctite 518 is expensive but if you are assembling engines you'll have it around anyway. Everything now looks good enough to fire up. |

|
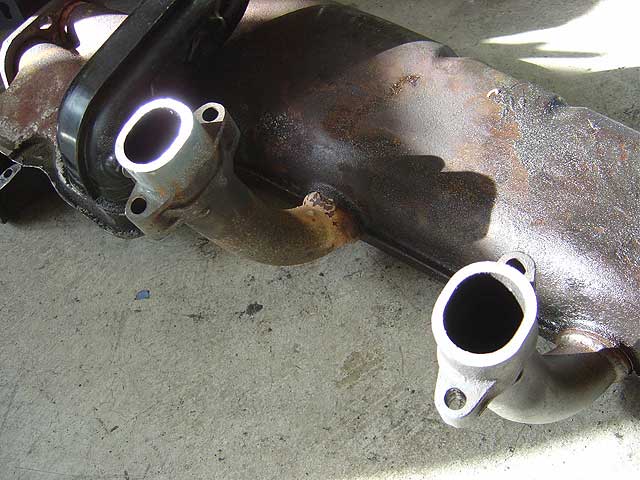
| The finished product. It's a lot of work but when you are dealing in used/reconditioned parts you have to perform these steps to ensure your engine lasts. |
05/02/05 - Created
09/07/11 - Fixed broken photos, added translate button, updated footer
07/15/19 - Google update: new adsense code, removed defunt translate button